Transaction Codes used – OBB8, OBB9
AR retentions: Contractually, the construction company and the owner define that a certain amount of the contract value is only paid after a certain timeframe (after a guarantee period). The retention amount can be calculated using SD conditions on the contract/sales order.
AR retention starts from the processes in L35: Contracting. When the contract is signed with the customer, the retention payment term is maintained on the contract to reflect this payment agreement.
When the billing point is reached, the project manager creates a billing document. The billing document can be configured to automatically transferred to finance to generate accounting document. The billing document can also be manually configured to check and release separately for additional authorization control
After the billing document is released to accounting, according to the defined retention term, the actual amount and due date of Accounts receivable is calculated and reflected on the account detail information. The accounting clerk can check this information.
The customer will pay the money according to retention. The accounting clerk entered the received money into the system to clear the relevant account receivable.
1 AR Retention
1.1 Check Customer Billing Document
Use
In this activity, you check the billing document and release it.
![]()
In some cases, the billing document is automatically released. If the billing document has already been released, the Release to accounting steps below (steps 11 and 12) can be skipped.
Prerequisites
The billing document was created in the L35 scenario, Contracting in section 2.6 Creating Billing Document.
Procedure
1. Access the transaction choosing one of the following navigation options:
|
SAP R/3 menu |
Logistics ®Sales and Distribution ® Billing ® Billing Documentà Change |
|
Business Role |
Project Manager |
|
Transaction code |
VA03 |
2. On the Display Order: Initial screen, in the Order field, choose F4 Help.
3. On the Search dialog box, on the Loading Agenda: Sales Doc. Grouped by PO. Number: Customer tab, enter the following data:
|
Field name |
Description |
User action and values |
Comment |
|
Purchase Order Number |
|
Test – Milestone* |
|
|
Sold to Party |
|
EC0600 |
|
4. Choose ![]() Start Search. The system finds the Sales order number, 1 . Double-click it to enter the value in the Order field.
Start Search. The system finds the Sales order number, 1 . Double-click it to enter the value in the Order field.
5. Choose ![]() Display Document Flow. On the Document Flow screen, select the Invoice 009xxxxxxx line item and choose
Display Document Flow. On the Document Flow screen, select the Invoice 009xxxxxxx line item and choose ![]() Display document to display the document detail.
Display document to display the document detail.
6. On the Invoice 9xxxxxxx (F2) Display: Overview of Billing Items screen, check the total amount of billing document, and make a note of the amount ___________.
7. From the menu, choose Goto à Header à Header.
8. On the Invoice 9xxxxxxx (F2) Display: Header screen, on the Header tab, in the Price data section, ensure that the value of the payment terms is RTN1.
9. Choose ![]() Back.
Back.
10. On the Invoice 9xxxxxxx (F2) Display: Overview of Billing Items screen, from the menu, choose Billing Document à Change.
11. On the Change Billing Document screen, choose ![]() Rel. to Accounting.
Rel. to Accounting.
12. The system displays the message Document 9XXXXXXX has been saved.
13. Choose ![]() Exit twice.
Exit twice.
Result
An Accounting document is generated from the sales order billing document. This function can be automatically achieved when you create the billing document. Depending on the configuration, normally, the project manager usually checks the billing document first and then releases it to Accounting.
1.2 Display Customer’s Account Information
Use
This activity displays the customer’s account information.
Procedure
1. Access the transaction choosing one of the following navigation options:
|
SAP ECC 5.0 Menu |
Accounting ® Financial Accounting ® Customers ® Account ® Display/Change Line Items |
|
Business Role |
Accounting Clerk |
|
Transaction code |
FBL5N |
2. On the Customer Line Item Display screen, enter the following basic data:
|
Field name |
User action and values |
Comment |
|
Customer |
EC0600 |
|
|
Company |
BP01 |
|
|
Line Item Selection: Status |
Select Open items |
|
|
Open at Key Date: Current Date |
|
|
|
Type |
Select Normal Items |
|
3. Choose ![]() Execute.
Execute.
4. On the Customer Line Item Display screen, choose ![]() Change Layout.
Change Layout.
5. From the Hidden Fields panel, choose the Net due Date and Payment term fields, then choose ![]() Show Selected Fields to transfer these fields from right panel to left panel.
Show Selected Fields to transfer these fields from right panel to left panel.
6. Choose ![]() Copy.
Copy.
7. One the Customer Line Item Display screen, find your created invoice document by looking up the document number.
![]()
There are two lines with this document number. Check the amount, payment due date and payment term. One line should have a 90% amount, a due date that is the current date, and a new payment term of 0001. Another line has a 10% retention amount, a due date of current date plus 1 year, and a payment term of BLCK.
8. Choose ![]() Cancel twice.
Cancel twice.
Result
An invoice with Retention Payment Terms has been automatically split into two line items with different new payment terms.


Payment Term ZRT1 (due in 365 days)
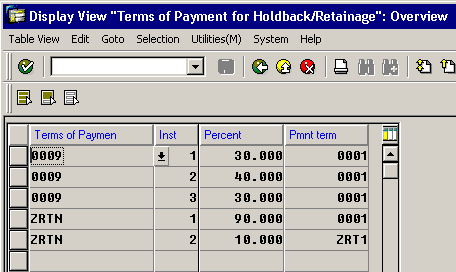
Splitting the Payment into 90% and 10% (retention)

